
The digital age requires one to ensure that the content created is visually appealing. Being able to make images transparent is very important, especially in graphic design. This is a way of ensuring the image blends well with any background, thus perfecting the view. One of the strongest tools that can be used for that purpose is Adobe Photoshop, with a number of procedures to get the job done. Master the technique for creating transparency in images using Photoshop through this highly instructional blog by one of the top web development company in UK, offering step-by-step advice and answering like frequently asked questions.

Transparency in images is a very fundamental objective that a graphic designer or, for that matter, a digital artist should acquire. These techniques enable images to perfectly and professionally combine with any backdrop image, adding visual appeal to them. In Photoshop, there are various tools and ways to help one in creating this transparency into images, depending on the type of image used and the level of complexity.
Understanding Image Transparency
Image transparency is when areas of the image are completely see-through, allowing the background or other images to show through. This effect is applied to web design, digital art, and photo editing very frequently. Transparent images can be utilized in logo and creation of overlays, custom graphics for use with different backgrounds, and the blend would just be perfect.
Why Transparency Matters
Image transparency can come in quite handy in many ways:
Versatility: Transparent images are suitable to be placed in front of every background, offering a host of applications for different kinds of projects.
Professionalism: Add to the professional look with clean and transparent images.
Visual Interest: They improve the depth and engage one’s designs.
Methods to Create Transparent Images in Photoshop
1. Magic Wand Tool for Transparency in Images using Photoshop
The Magic Wand Tool proves useful if you want to select an area of the same hue to avoid the solid backgrounds of the images.
1. Open Your Image: Open your image in Photoshop.
2. Select the Magic Wand Tool: Click on the Magic Wand Tool in the toolbar or press W.
3. Adjust Tolerance: You can set the level of Tolerance, depending on your image. A low tolerance only selects colors very similar to that area you click while a high tolerance selects a broader range.
4. Click the Background: In this step, you should click the area which you want to be transparent. Now, the whole area of similar color will be selected with this tool.
5. Delete Selected Area: Press the delete key; it will become transparent with a deleted area. If some of the background still remains, adjust the tolerance and try again.
6. Save the Image: Save your image as a PNG, retaining it in its transparency.
Under Magic Eraser Tool, anyone can make very quick removal of solid-color backgrounds. Next, select the tool and click in the area you want to remove—it turns transparent. Now, for more detailed work, Background Eraser will do an exact selection by erasing pixels of similar color around edges of an object with fine details.
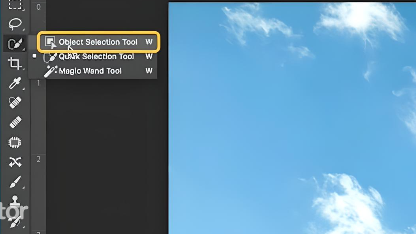
2. Make the Background of an Image Transparent in Photoshop with the Quick Selection Tool
The Quick Selection Tool works best while selecting objects that have a complex background. To enable your image with a transparent background, consider these steps.
1. Open Your Image: Open up the image in Photoshop.
2. Select the Quick Selection Tool: You will come across this tool during the process in the toolbar, or simply click the W key from the keyboard.
3. Click the button Select Object: Drag the tool over the object you want to keep. Photoshop automatically picks up on edges.
4. Refine Your Selection: Use the Refine Edge tool to further finesse your selection. The smoothness of edges and areas that one desires to omit can be properly corrected through the settings.
5. Inverse the Selection: The shortcut Select > Inverse selects background and not the object.
6. Delete Background: Press delete keys for making the background transparent.
7. Save the Image: Save in PNG format.
3. Layer Masks for Transparency in Images using Photoshop
Layer masks bring more control and finesse to any type of editor for smoothly working with an image’s transparency without causing damage to it.
1. Open Your Image: Open your image in Photoshop.
2. Duplicate the Layer: Duplicate that layer by right-clicking on the layer; under this, select Duplicate Layer from the context menu.
3. Add Layer Mask: Click the Add Layer Mask Icon at the bottom of the Layers panel.
4. Select Brush Tool: Click the Brush Tool in the toolbar, or type B.
5. Painting on the Mask: Above, with the mask selected paint black over areas that are to be transparent. If you need to reveal areas use white.
6. Refine the Mask: Brush and Hardness refine at edges.
7. Save the Image: Save the image in format PNG to retain the transparency.
Another effective method involves the Channels panel. To do this, one simply needs to create a new alpha channel that defines in what areas of the image the transparency is going to be. Accordingly, how much of an image will be transparent can be controlled by quick selection and refining areas using the Brush Tool on the alpha channel.
4. Creating Transparency in Images in Photoshop Using the Pen Tool
The Pen Tool is most accurate for complicated selections, so with that, it’s highly suitable for intricate objects.
1. Open Your Image: Open your image in Photoshop.
2. Select the Pen Tool: Click on the Pen Tool in the toolbar or, for a shortcut, press P.
3. Outline by Clicking: Click around on the object that will bring out a space for a path. Make sure you really click your outlines and drag the click box really carefully around your object for your outline.
4. Convert Path to Selection: Right click on the work path, and from this contextual menu, select Make Selection.
5. Reverse Selection: Go to Select > Inverse and grasp out the background.
6. Delete Background: Press delete keys for making the background transparent.
7. Save the Image: Save your image as a PNG, retaining it in its transparency.

Practical Tips to Create Transparency in Image using Photoshop
1. High-Resolution Image: Always work with a high-resolution image to get desirable results.
2. Zoom in: This wants to be accurate, so it will zoom in.
3. Feather Edges: This will give your selected choice feather edges and more of a natural blend.
4. Play with the tools: Most of these tools are going to be better at different images than others. Experiment and find which is going to help in what you’re working on.
5. Save the Image: Save it in PNG, retaining it in its transparency.
Statistical Data on transparency in images Photoshop
Web Usage: According to one study by W3Techs, 77.3% of all websites using image formats use PNG. This kind of shuttering is due mainly to the fact that PNG supports transparency, and JPEG doesn’t.
Design Industry: Graphic Design USA reported an estimated 89% of professionals working with Photoshop, while 68% of these professionals use its transparency features regularly.
Marketing Impact: A report indicates that 74% of marketers agree that unique graphics captivate audiences more than usual stock photography.
FAQs
1. Why doesn’t my image have a transparent background when I save it?
Ensure that you save the image in a format that supports transparency, such as a PNG.
2. Can only part of an image be transparent?
Yes, parts of the image can be made to be transparent and some can remain nontransparent. This can be done with Layer Masks or the Eraser Tool.
3. How do I fix the jagged edges?
Refine Edge or Feather your selection edges. Zooming in to work is also helpful for sharp edges.
4. But what if it’s a trickier background?
More tricky backgrounds can be isolated using the Pen Tool or with greater accuracy, a Quick Selection Tool paired with Layer Masks.
5. Is there an easier way for beginners?
The Magic Wand Tool is the easiest to begin working with, especially if you have many images with solid backgrounds. Once you become more comfortable, you can progress to quick selection tools and layer masks, ensuring your graphics align with top-tier web design company in UK.
Conclusion
Every designer and digital artist should have the capability to deal with the transparency of an image in Photoshop. Knowing how to make a piece of the image transparent unlocks doors of creativity to have flexibility with any project, basically from logos and Web elements through photo editing. Following these methods and tips in this tutorial, you’ll be creating professional quality transparent images that really bump up the overall look. Feel free to experiment with a number of tools and techniques until you get the perfect cocktail that works for you. Happy designing!
Be sure to save in a format that supports transparency, like PNG, and you’ll keep that transparent background. Experiment these various techniques to find best practices on how to achieve transparent images in Photoshop.